AWS Network - Public and Private Subnets
In this post, I will cover the following topics;
- VPC
- Subnets
- Availability Zones
- Internet Gateway
- NAT Gateway
- Route Tables
- Public Subnets
- Private Subnets
Sometimes I like to recycle knowledge, and this is a basic guide to network concepts, enabling you to grasp things quickly when necessary.
This post is part of the AWS collection. In my opinion, understanding AWS Network is fundamental for most engineers operating within AWS.
Even if you are not closely involved with the network in your daily routine, knowing the concepts about AWS Network will help you understand what’s going on under the hood, especially in the event of an incident.
A good analogy for a Network is like a building, where the foundation for construction is the stakes and the plumbing, just as it is for the network. Once this is done, it’s very difficult to make major structural changes (but not impossible).
Let’s get started
VPC
AWS VPC stands for Virtual Private Cloud, which allows you to isolate AWS resources within a logically defined virtual network. The VPC is a virtual network that closely resembles a tradicional network you’d operate in your own data center. After creating this VPC, you can add subnets.
A VPC comprises several components, including;
- Subnets
- Route Tables
- Network Connections
When setting up a new VPC, you will encounter the CIDR (Classless Inter-Domain Routing) notation, a method for dividing and allocating IP Address ranges and subnets.
- You can find this format for CIDR as follows;
10.0.0.0/24. - Each of these numbers is called an octet, representing 8 bits, and if you add them all up that’s 32 bits.
After the slash (/) in /24, it means that you will only change the last octet. For /16, you can change the last two numbers. For /8, you can change the numbers in the last three octets.
Certainly, there are more combinations of octets that allow you to change the range of IP addresses, but these are the easiest ways to remember. I can write another post focusing on this content one day :)
/24last number -10.0.0.1-10.0.0.254/16last two numbers -10.0.0.1-10.0.255.254/8last three numbers -10.0.0.1-10.255.255.254
All those numbers 25{5,4} represents the host available in your network, to illustrate follow an exemple;
10.0.0.0/24- You can have
254available hosts in this network.
- You can have
10.0.0.0/16- You can have
65534available hosts in this network.
- You can have
10.0.0.0/8- You can have
16777214available hosts in this network.
- You can have
I really recommend uses IPCalc to make these calculations more efficiently. https://jodies.de/ipcalc
Subnets
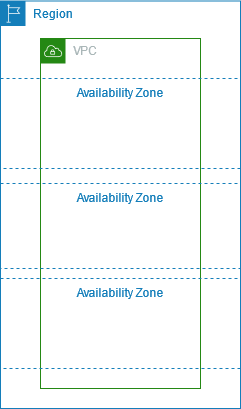
Subnets stand for a range of IP addresses in your VPC. There are many ways to use subnets, and each subnet must reside in a single Availability Zone.
Subnets are utilized to enhance the security and efficiency of network commnunications; you can think of them like a postal codes, used for routing packages from one location to another.
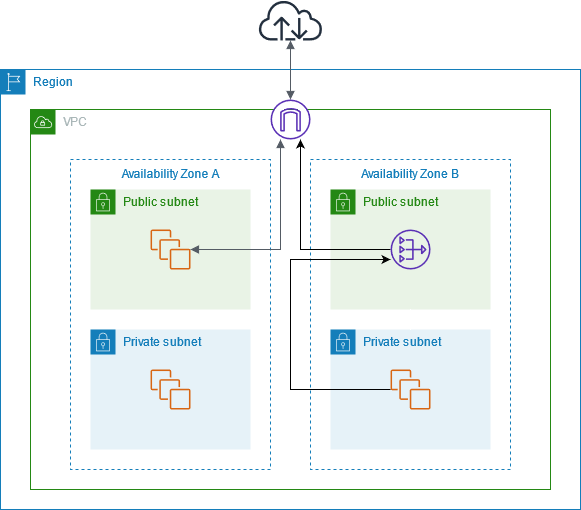
Availability Zones - AZs
So, i mentioned Availability Zone, but what does that mean ?
The term Availability Zone refers to a distinct location within a Region, consisting of one or more discrete datacenters, each with redundant power, network and connectivity housed in separete facilities.
If an availability zone goes down, you have high availability by having another availability zone ready to serve your application.
It is recommended to have at least 3 AZs serving services and instances. If one availability zone goes down, having 3 ensures you only lose 1/3 of your capacity. If you choose use only 2 could result in losing half of your capacity.
Let’s delve into more concepts (Internet Gateway and NAT Gateway), and then I will demonstrate what they are and how to use them:
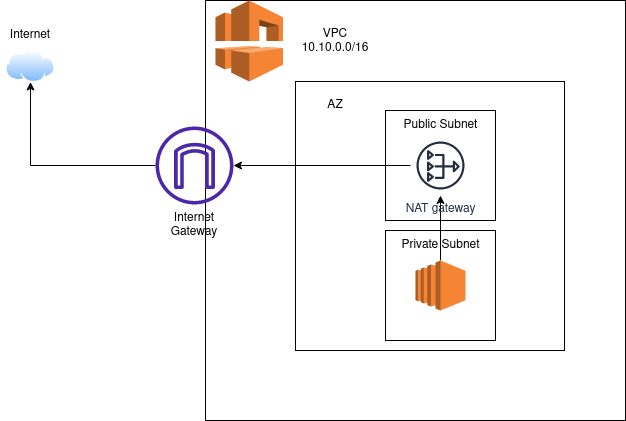
Internet Gateway

An internet gateway is a horizontally scaled, redundant, and highly available VPC component that facilitates communication between your VPC and the internet. It supports both IPv4 and IPv6 traffic.
Once an Internet Gateway is created, it is attached to your VPC, and then, enabling resources in your public subnets to connect to the internet.
To remove internet access, you can detach the internet gateway from your VPC and then delete it.
There is no charge for an internet gateway, but data transfer charges apply for EC2 instances that use internet gateways.
NAT Gateway
A NAT Gateway is a Network Address Translation (NAT) service used in instances within a private subnet that need to connect to services outside your VPC. However, external services cannot initiate a connection with those instances. This means I can reach out, for example, to update my packages, but nothing outside the VPC can come in and access the server.
When you provision a NAT gateway, you are charged for each hour it is available and for each gigabyte of data it processes. If most of the traffic through your NAT Gateway is to AWS Services, there are potential cost-saving procedures you can implement. Consider creating an interface endpoint or gateway endpoint for AWS services that support such endpoints.
NAT Gateways are located in public subnets, with each NAT Gateway created in a specific Availability Zone and implemented with redundancy in that zone.
They support protocols such as TCP, UDP, and ICMP, and they work for both IPv4 and IPv6 traffic. NAT Gateways support up to 5 Gbps of bandwidth and automatically scale up to 100 Gbps.
A NAT Gateway can process one million packets per second and scales automatically up to ten million packets per second. Beyond this limit, a NAT Gateway will drop packets. To prevent dropped packets, it is recommended to split your resources into multiple subnets and create a separate NAT Gateway for each subnet.
Each IPv4 address can support up to 55,000 simultaneous connections to each unique destination. You can choose the private IPv4 address to assign to the NAT gateway or have it automatically assigned from the IPv4 address range of the subnet.
It’s important to note that you cannot associate a security group with a NAT gateway. However, you can associate security groups with your instances to control inbound and outbound traffic.
For controlling traffic to and from the subnet for your NAT gateway, you can use a network ACL. NAT gateways use ports 1024–65535.
It’s crucial to be aware that you can’t route traffic to a NAT gateway through a VPC peering connection, a Site-to-Site VPN connection, or AWS Direct Connect. A NAT gateway cannot be used by resources on the other side of these connections.
And you won’t be able to create a public NAT gateway if you’ve exhausted the number of Elastic IP addresses allocated to your account.
Public and Private subnets
Normally, an AWS VPC is structured by Public Subnet and Private Subnet, this means, you have a public subnet for all of your public applications and a private subnet for things that you don’t want to be public.
Basically, If a subnet is associated with a route table that has a route to an internet gateway, it’s known as a public subnet. If a subnet is associated with a route table that does not have a route to an internet gateway, it’s known as a private subnet.
Route Tables
In AWS, a route table is a set of rules that determines where network traffic is directed.
Each Subnet in your VPC is associated with a route table which controls the traffic flow between subnets.
There is a main default route table created when you create a subnet, and all unassociated subnets use this by default. In this default route table, you will find one route, specifically for local traffic, encompassing all traffic within the VPC.
Private/Public Route Tables
In this scenario, you need to configure one route table for the public subnet and another for the private subnet, named:
rt-subnet-privatert-subnet-public
Then, you can associate the public subnet and the private subnets with their respective route tables. It is recommended to associate at least 3 subnets distributed across availability zones.
Public Subnets
When using public subnets, you have a direct connection to the Internet. Services such as Load Balancers, Web Servers, and EC2 Instances (bastion hosts) can be utilized in this layer.
Now, how can you enable communication from the public subnet to the Internet?
It’s straightforward. In your public route table (rt-subnet-public`), add a new route with the following settings:
| Destination | Target |
|---|---|
| 0.0.0.0/0 | igw-0000000000 |
The destination is set to 0.0.0.0/0, allowing all IPs to access the internet with the target being the Internet Gateway (igw-XX). Your public route table now has a path to the internet gateway.
If you try to launch an EC2 instance in the public subnet, it will have public access over the internet. (Don’t forget to create a Security Group allowing SSH protocol access to this instance)
Private Subnets
In the private subnet, only private communication is allowed.
How can your EC2 instances in the private subnet access the internet without allowing inbound traffic?
Here’s a solution: use the NAT Gateway, which allows the private subnet to establish outbound traffic to the internet while preventing incoming connections from the internet to the instances.
So, how do you set up internet communication within private subnets?
First, in your private route table, add a new route with the following settings:
| Destination | Target |
|---|---|
| 0.0.0.0/0 | nat-0000000000 |
The destination is again set to 0.0.0.0/0, allowing all IPs to access the internet, with the target being the NAT Gateway (nat-XX).
Now, if you try to update packages within EC2 instances, the communication to the internet will work.
Takeaways
Understanding these basic concepts makes it much easier to resolve network issues.
Creating a well-structured VPC is like an art; you need to think not just about solving the present solution but also look beyond your imagination and consider the future. Otherwise, you may encounter challenges in expanding your network if you decide to use short network ranges.