Kubernetes Probes
In this post, I will cover the Kubernetes Probe.
If it’s your first time here and you’re not familiar with what Kubernetes is, I’ll briefly explain. Kubernetes is a robust and extensive open-source platform for managing containerized workloads and services. It provides a framework to run distributed systems resiliently, taking care of scaling and failover for your application, offering deployment patterns, and more.
Kubernetes provides you:
- Service Discovery and Load Balancing
- Storage Orchestration
- Automated Rollout and Rollbacks
- Automatic Bin Packing
- Self-Healing
- Secret and Configuration Management
- Batch Execution
- Horizontal Scaling
- IPv4/IPv6 dual-stack
- Designed for Extensibility
Kubernetes is very complex with a lot of components. I really love the way that K8s was designed, and I hope to write a lot more about this
Let’s Get Started
When you need your systems to detect a faulty condition in your applications and remediate the situation immediately and automatically, Health Checks could be a great fit to determine if an instance of your application is working or not within distributed systems.
Working with containers in a distributed system could be hard to manage. By default, Kubernetes starts to send traffic to a Pod when all the containers inside the Pod start and restarts containers when they crash.
Before we delve into Probes, it’s important to know more about how pod health checks work. Pods are the smallest deployable units in the Kubernetes world, wrapping containers and hosting containerized applications. The PodSpec defines containers, and you can have multiple containers within Pods.
PODs Health Checks
| Startup | Liveness | Readiness | |
| On Failues | Kill Container | Kill Container | Stop sending traffic to Pod |
| Check types | http, exec, tcpSocket | http, exec, tcpSocket | http, exec, tcpSocket |
The probe will perform diagnostics on the container’s health using the following handlers:
- ExecAction: executes a command inside the container. If the command returns with exit code 0, then the container is marked as healthy. Otherwise, it is marked unhealthy. This type of probe is useful when you can’t or dont’want to run an HTTP server, but can run command that check whether or not your application is healthy.
- TCPSocketAction: performs a TCP Check against the container’s IP address on a specified port. If it can estabilish a connection, the container is considered healhty; if it can’t it is considered unhealthy. TCP Probes comes in handy if you have a scenario where HTTP probes or command probe don’t work well. E.g. a
gRPCorFTP Services. - HTTPGetAction: performs an HTTP GET request on the container’s IP address. Kubernetes pings a path, and if it gets an HTTP response 200 or 300 range, it marks the app is healthy. Otherwise it is marked as unhealthy.
The probe can return:
- Success: the diagnostic passed on the container.
- Fail: the container failed the diagnostic and will restart according to its restart policy.
- Unknown: the diagnostic failed and no action will be taken.
Kuberentes Probes are used to detect:
- Containers that haven’t started yet and can’t serve traffic.
- Containers that are overwhelmed and can’t serve additional traffic.
- Containers that are completely dead and not serving any traffic.
Kubernetes offers three types of health checkers:
- StartupProbe
- LivenessProbe
- ReadinessProbe
StartupProbe
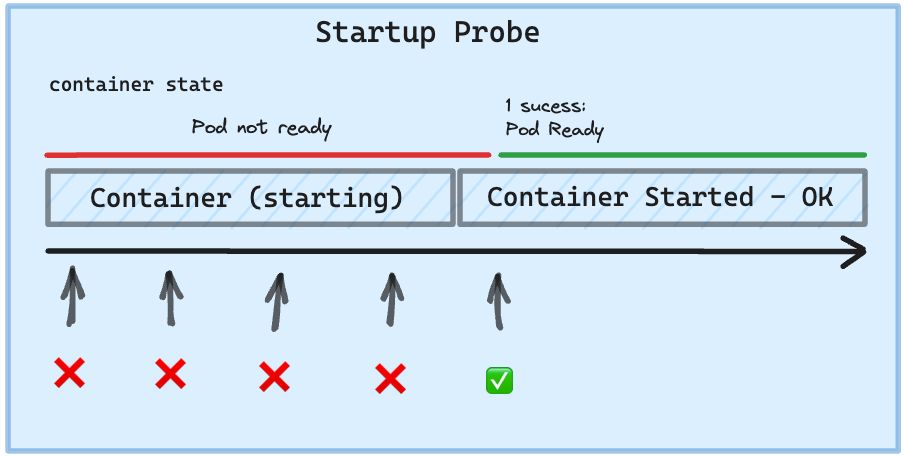
It indicates whether the application within the container has started. The Startup Probe has higher priority than the other two probe types.
All other probes are disabled if a startup probe is provided until it succeeds. If the startup probe fails, the kubelet kills the container, and the container is subjected to its restart policy.
Startup probes are useful in situations where your application can take a long time to start or could occasionally fail on startup.
Here’s a use case where you can fit with Startup Probe:
Slow Starting Containers: When the container application takes a long time to start and reach its normal operating state. Ensure the container doesn’t enter a restart loop due to failing health checks before it’s finished launching.
The Startup Probe feature is supported as beta in Kuberenetes v1.18, it comes to solve slow-start applications, it is much better than increasing initialDelaySeconds on Readiness or Liveness probes.

LivenessProbe
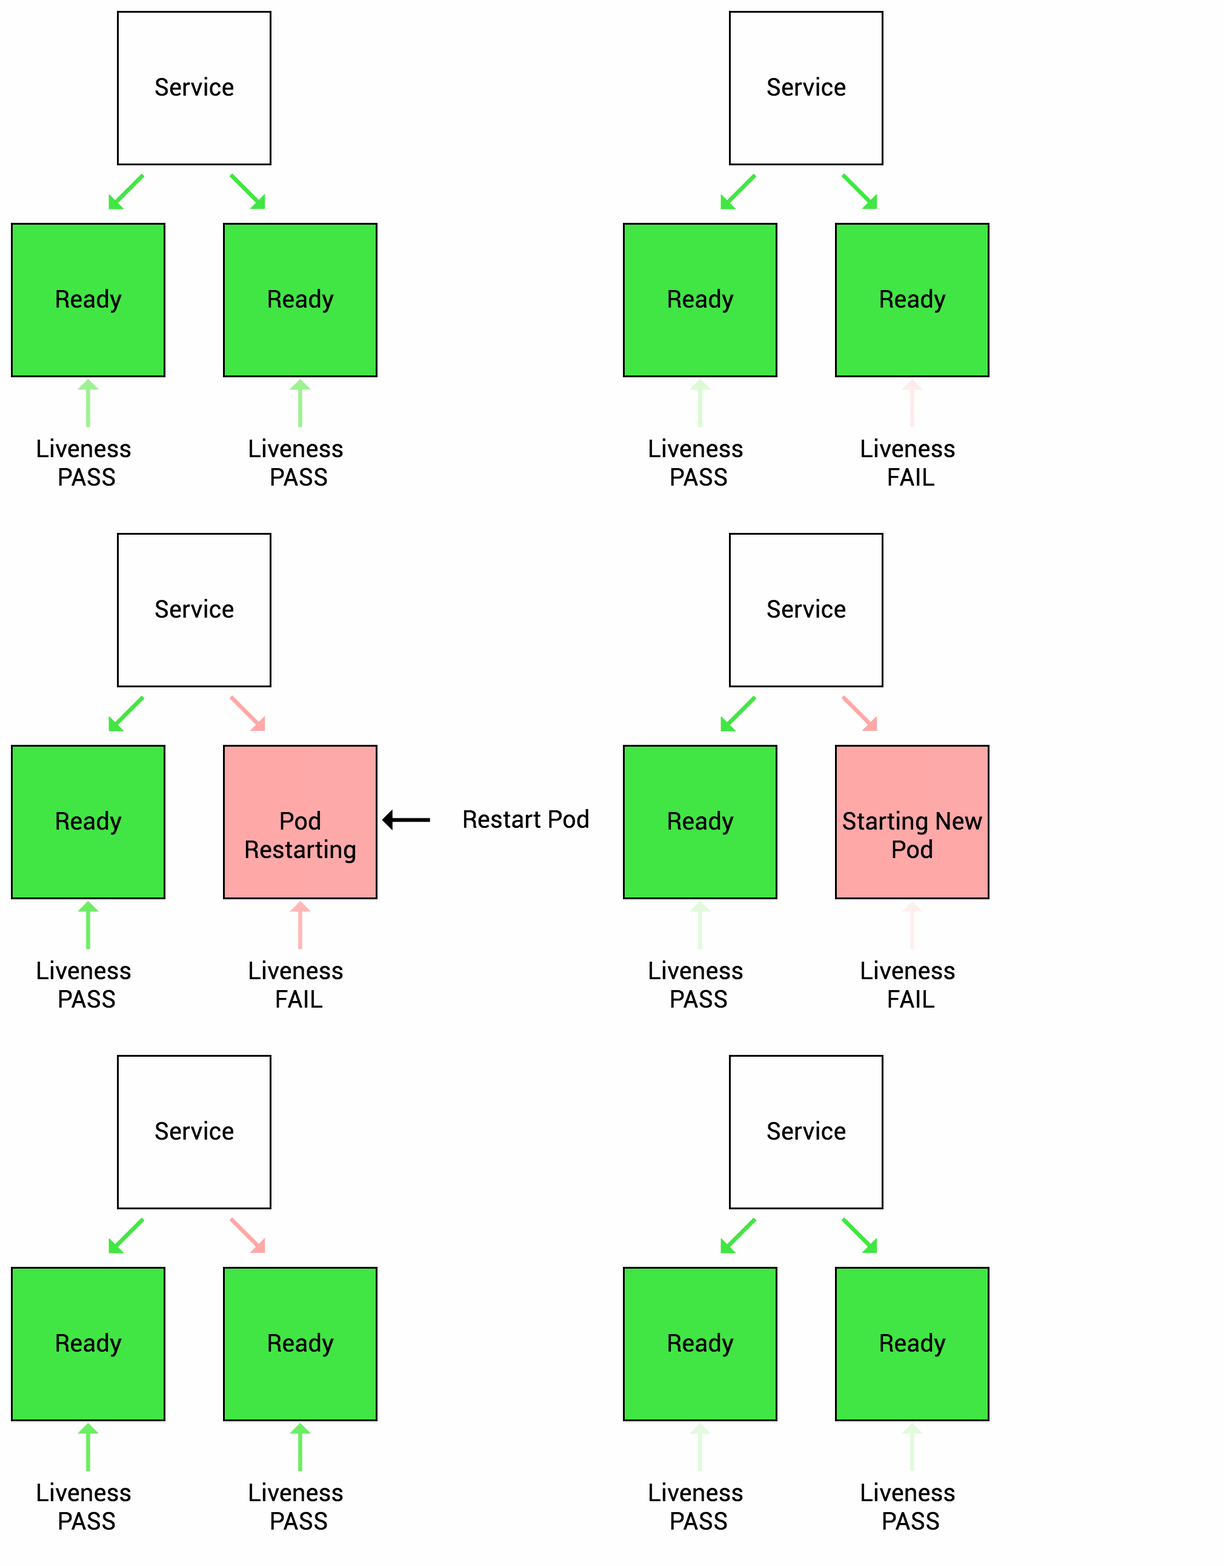
The LivenessProbe is used by Kubelet to know when to restart a container. It indicates whether the container is running inside the Pod. E.g. Liveness probes could catch a deadlock, when application is running, but unable to make progress. Restarting a container in such a state can help to make the application more available despite bugs. When your app is dead, Kuberentes removes the Pod and starts a new one to replace it. If a container does not provide a Liveness Probe the default state is success.
In a simple words, if the health check application is not working, By using a Liveness Probe, Kuberentes detects that the application is no longer serving requests and restarts the Pod.

ReadinessProbe
The Readiness Probe method evaluates and checks the dependencies of your application before your app is ready. Imagine checking if your database is running and receiving traffic or sending requests to an external API dependency to verify communication. Figuring out these issues before the application is running would be great, right?
Therefore, Readiness comes to solve those problems. In simple words, you can check if your dependencies are ready. Here are some examples:
- Database requests
- Authorization requests
- Service for telemetry requests
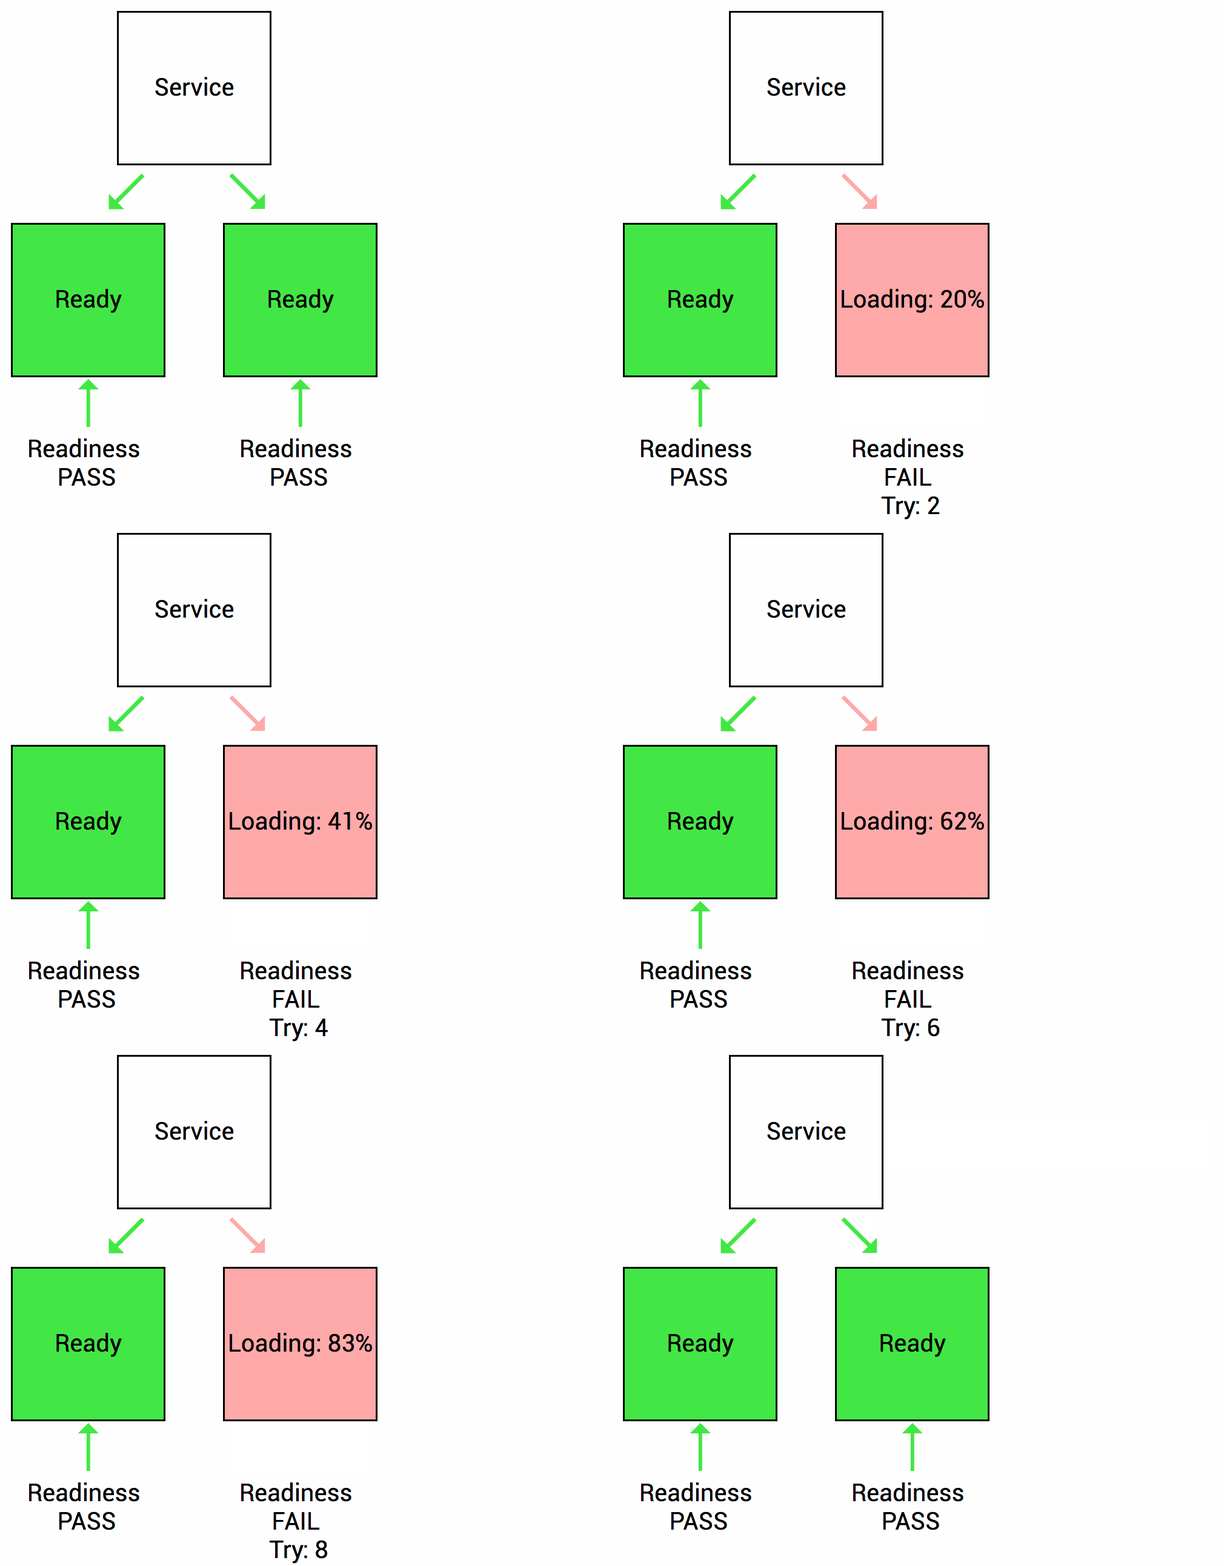
Another good example of when to use a Readiness Probe is if your application might need to load large data or configuration files during startup, or depend on external services after startup. You want to avoid killing your application, so the pod with the Readiness Probe configuration will report that it is not ready and does not receive traffic through Kubernetes services.
Unlike a Liveness Probe, a Readiness Probe doesn’t kill the container. If the Readiness Probe fails, Kubernetes simply hides the container’s Pod from corresponding Services, so no traffic is redirected to it.
In other words, when the Readiness Probe is ready, the Kubernetes Service allows sending traffic to the Pod. If the Readiness Probe starts to fail, Kubernetes stops sending traffic to the Pod until it passes.
A side effect of using a Readiness Probe is that it can increase the time it takes to update deployments.

Examples of Probes Declarations e.g (pod.yaml)
- StartupProbe
startupProbe:
    httpGet:                             # make an HTTP request
        path: /healthz                   # endpoint to hit
        port: 8080                       # port to use
        scheme: HTTP                     # or HTTPS
    failureThreshold: 3                  # how many failures to accept before failing
    timeoutSeconds: 1                    # how long to wait for a response
    initialDelaySeconds: 3               # how long to wait before checking
    periodSeconds: 3                     # how long to wait between checks
    successThreshold: 1                  # how many successes to hit before accepting
- LivenessProbe
...
livenessProbe:
    failureThreshold: 3     # how many failures to accept before failing
    timeoutSeconds: 1       # how long to wait for a response
    initialDelaySeconds: 3  # how long to wait before checking
    periodSeconds: 3        # how long to wait between checks
    successThreshold: 1     # how many successes to hit before accepting
    httpGet:                # make an HTTP request
        path: /_healthz     # endpoint to hit
        port: 8080          # port to use
        scheme: HTTP        # or HTTPS
...
- ReadinessProbe
...
ReadinessProbe:
    initialDelaySeconds: 3  # how long to wait before checking
    periodSeconds: 3        # how long to wait between checks
    successThreshold: 1     # how many successes to hit before accepting
    failureThreshold: 1     # how many failures to accept before failing
    timeoutSeconds: 1       # how long to wait for a response
    httpGet:                # make an HTTP request
        path: /_healthz     # endpoint to hit
        port: 8080          # port to use
        scheme: HTTP        # or HTTPS
...
- More use cases with
execcommand,tcpSocketandhttpGetwithhttpHeaders:
# You can just define the probes {ReadinessProbe|LivenessProbe|StartupProbe}
...
    exec:
        command:
        - cat
        - /etc/nginx/nginx.conf
...
    tcpSocket:
        host:
        port: 80
...
    httpGet:
        path: /_healthz
        port: 8080
        scheme: HTTP
        httpHeaders:  # An array of headers defined as header/value tuples
            - name: Host
              value: myapplication1.com
...
Takeaways
The Kubernetes Probes in your distributed system ensure higher uptime and better reliability. Often, some containers within a pod could receive a huge load of requests and start to crash or the application slows down. When you need to make certain adjustments in your application and wait for the application to be ready for some reason—preparing the container, loading datasets, verifying external dependencies such as databases, authorization, APIs—using probes is the best way to ensure that validation is okay before having the traffic routed to the Pod.
The probes can help to understand the health of the application. We must understand how fast our application starts up and how it behaves under load to decide what the various probe settings should be in order to meet SLAs or SLOs.